After my last game using the Britains knights, I decided that I needed some field artillery as it was an increasingly important feature of late medieval warfare. I had a look around to see what was available in 1/32 or similar but didn’t find anything that met my requirements or my pocket. Consequently, I decided to build my own.
So, I consulted my books and decided I wanted to build a breech-loader. Then I searched the internet for more information and pictures of medieval artillery, particularly period illustrations. After a good rummage, I found a few bits and bobs that I could use and made a rough-to-scale sketch of the gun I was to build. In the end, I built two guns as it was just as easy as building one and I had sufficient parts.
The gun carriages, trails and axles were cut and shaped from paulownia wood, an alternative to balsa. The trails were then attached to the carriages with small brass hinges to allow the guns to be elevated or depressed if I wanted. I then applied EVA ironwork to the carriages, adding rivets by pushing an empty clutch pencil into the foam. Holes were also drilled into the carriages to accommodate metal eyes made from wire so chains could be added later.
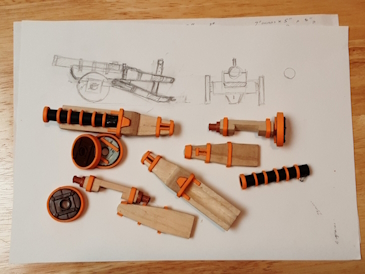
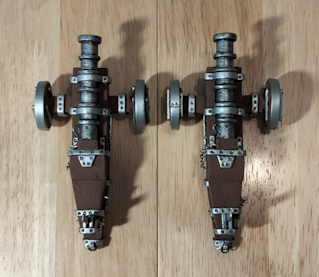
The gun barrels are simply plastic cylinders from the centre of dog waste bags with the ribbing cut from EVA foam and glued on. As many early medieval breech-loading cannons had replaceable powder chambers, I attached handles made from pieces of paper clip to the chamber sections and drilled touch holes.
The wheels came from a plastic toy battering ram base that I bought from an Op shop quite some years ago. As the wheels were hollow, I filled them with two part epoxy putty to make them solid. EVA foam tyres and reinforcing straps were added. The wheels were then attached to the axles with screws and EVA foam reinforcing straps were glued on to the axles where appropriate and then “riveted”.
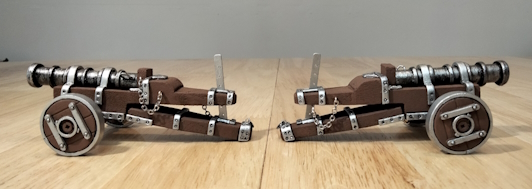
I coated all the EVA foam parts with an acrylic sealer to stiffen them up ready for painting and then painted the cannon barrels and the area where they would be attached to the carriages. After that, wooden wedge “breech blocks” and the gun barrels were glued onto the carriages and more EVA straps were added. Next, the axles and wheels were attached and the almost completed cannons were painted in a simple toy soldier style.
Sections of an old watch chain were added to connect the “breech blocks” to the carriages and to attach metal pins to hold the guns at their desired elevation. Finally, I cut some strips of plastic card and drilled holes in them to make the “racks” for the pins, painted them, and glued them into slots on the trails.
I am really quite happy with how they turned out. They certainly look the part. These infernal engines will give my old Britains / Herald siege engine crew something to make go boom when my knights take the field again.


Magnificent! You have done such an excellent job on those.
LikeLike
Thank you. I expect they will see action soon enough.
LikeLike